Getting Started
Runtime
To access all the extension methods, import the library at the top of your script.
using TetraCreations.Core;
To access all utility scripts :
using TetraCreations.Core.Utility;
Which include :
- A generic Singleton pattern implementation.
- A
TimerManagerto create and run timer in a single Update method. - A simple
TriggerColliderscript to detect Rigidbodies entering/leaving a trigger collider. - An example of how to manage audio settings, using the
AudioManagercomponent to generate volume sliders at runtime. FloatValueConditionto evaluate whether a float value is lower than, Greater than, equals to or between other values to trigger methods from different listeners.
Editor
using TetraCreations.Core.Editor;
Then you can access to :
- AssetDatabaseExtensions :
- Get assets by their type inside one or multiple folders.
- Verify if an asset exists.
- Create an asset at a specific path.
- Verify the path and the asset name before its creation.
- AudioMixerExtensions :
- Get the list of exposed parameters
- MonoScriptExtensions :
- Create scriptable object instance using the reference of the MonoScript.
- PathReferenceExtensions :
- Extend
PathReferencefromTetraAttributesto create/load/delete/count assets directly from the folder reference.
- Extend
Warning
Remember that you need to move all your editor scripts to an Editor folder or to use #if UNITY_EDITOR / #endif otherwise your build will not compile !
Extensions examples
1. AudioMixer
A recurring issue in Unity is managing the audio settings using an AudioMixer where we expose volume parameters. However, it's a floating number representing the sound level in decibels. To modify it using a slider from the UI, we have to convert the linear value to a decibel value. That's why I've got an audio mixer extension method that does the conversion automatically :
AudioMixer.SetLinearVolume("MusicVolume", 0.8f);
The first parameter is the name of the Exposed Parameter from the AudioMixer.
The second parameter is the linear volume value, here 0.8f is equals to -1.94 dB.
The third parameter determines if we clamp the linear volume to not exceed the safe audio limit in decibel which is defined as -80 dB to +0 dB, it is set to true by default.
See the AudioManager example scene for more details.
2. Canvas Group
There are plenty of extension methods that makes the code easier to read and avoid repetition, another example is how to show or hide UI elements using CanvasGroup.
/// <summary>
/// Show a canvas group while blocking raycasts
/// </summary>
/// <param name="canvasGroup"></param>
public static void Show(this CanvasGroup canvasGroup)
{
    canvasGroup.alpha = 1;
    canvasGroup.blocksRaycasts = true;
}

/// <summary>
/// Hide a canvas group while disable blocking raycasts
/// </summary>
/// <param name="canvasGroup"></param>
public static void Hide(this CanvasGroup canvasGroup)
{
    canvasGroup.alpha = 0;
    canvasGroup.blocksRaycasts = false;
}
This is something I do all the time in every project.
It's recommended using a CanvasGroup instead of enabling/disabling the entire gameObject which is generally more costly.
3. List
You can find a few examples inside the package, another common one is list and collection's extensions :
_numbers = new List<int>{ 1, 2, 3, 4, 5, 6, 7, 8, 9, 10 };

// Shuffle all elements using Fisher-Yates algorithm which produces an unbiased permutation
_numbers.Shuffle();

// Debug.Log all elements
Debug.Log("Numbers : ");
_numbers.Log();

// Add an element if it's not already in the list
_numbers.AddItNotContains(5);

// Loop backwards
Debug.Log("Reverse loop : ");
foreach(var number in _numbers.ReverseLoop())
{
    Debug.Log(number);
}

// Adding existing numbers
_numbers.AddRange(new List<int> { 1,5,8 });

// Determine if the list contains unique elements
Debug.Log("Contains unique elements : " + _numbers.HasUniqueElements());

// Create a new list without the duplicates
var withoutDuplicates = _numbers.RemoveDuplicates();

Debug.Log("Wihout duplicates : ");
withoutDuplicates.Log();
Utilities examples
1. Generic Singleton Pattern
To change any MonoBehaviour script to a Singleton simply extend from Singleton<T> where T is the type of your script.
For example, I have a Singleton to start/update all timers in my game :
public class TimerManager : Singleton<TimerManager>
{
  [Title("Active Timer")]
  [SerializeField] [ReadOnly] private bool _hasTimers = false;
  [SerializeField] [ReadOnly] private int _activeTimerCount = 0;
  [SerializeField] [ReadOnly] private List<CountdownTimer> _activeTimers;

  protected override void OnAwake()
  {
    base.OnAwake();

    _activeTimers = new List<CountdownTimer>();
  }
}
The important thing to notice is the override of the OnAwake() method, by default all MonoBehaviour use Awake() when the scene starts.
However, the generic abstract class Singleton already calls Awake() to initialize itself, it checks for any duplicated instances in the current scene, and then it calls a protected virtual method OnAwake() that you can override. If you call Awake() instead then the Singleton won't be
initialized and it will not work.
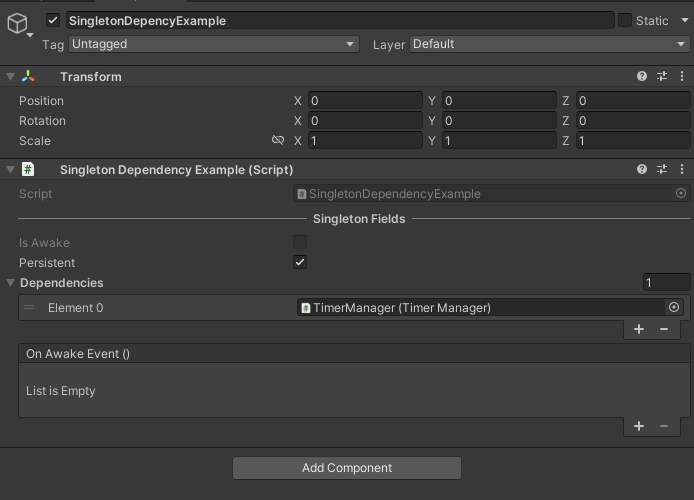
When using the Singleton pattern, one common issue is trying to call a method from the Singleton inside the Awake method of another Singleton,
we don't know which one is initialized first. To avoid dealing with script execution order, we can the other script as a dependency inside the inspector.
In the example screen below it will wait until TimerManager is initialized.
2. AssetDatabase
Inside Editors or Scriptable Object I often need to load assets, let's imagine that I have imported 200 Sprites in my project, and I want to create a scriptable object for each one of them and directly assign the sprite to it.
Warning
Remember that you need to move all your editor scripts to an Editor folder or to use #if UNITY_EDITOR / #endif otherwise your build will not compile !
I can use the AssetDataExtensions to get every sprite from a specific folder:
var spritesPath = "Assets/Example/Sprites";
var sprites = AssetDatabaseExtensions.GetAssetsFrom<Sprite>(new string[]{ spritesPath });

foreach (var sprite in sprites)
{
    /// Do something with each sprite
}
Using PathReference class from TetraAttributes makes it even easier :
[SerializeField] private PathReference _audioClipFolder;

void LoadAudioClip()
{
    // We could also use the GetAssets<T>() extension method directly from the PathReference, which does the same thing.
    var audioClips = _audioClipFolder.GetAssets<AudioClip>();

    foreach(var audioClip in audioClips)
    {
        /// Do something with each sprite
    }
}
Without the extension method the code to get assets is not generic and can be difficult to remember :
var path = "Assets/Game/Sprites";
var assets = AssetDatabase.FindAssets($"t:sprite", new string[] { path }).ToList()
    .Select(AssetDatabase.GUIDToAssetPath)
    .Select(AssetDatabase.LoadAssetAtPath<Sprite>)
    .ToList();
Using a generic method accepting any UnityEngine.Object is extremely useful.
We can also load an asset by its name, this however will search in the entire AssetDatase as we don't specify a folder.
3. Trigger Collider
Another utility that I use in every project : The TriggerCollider component detects colliders and filters them depending on their layers (See LayerMaskFilter). It is used to call methods from other scripts by invoking OnDetectedColliderEnter and OnDetectedColliderExist events.
Note
Inactive GameObjects in the scene are not detected.
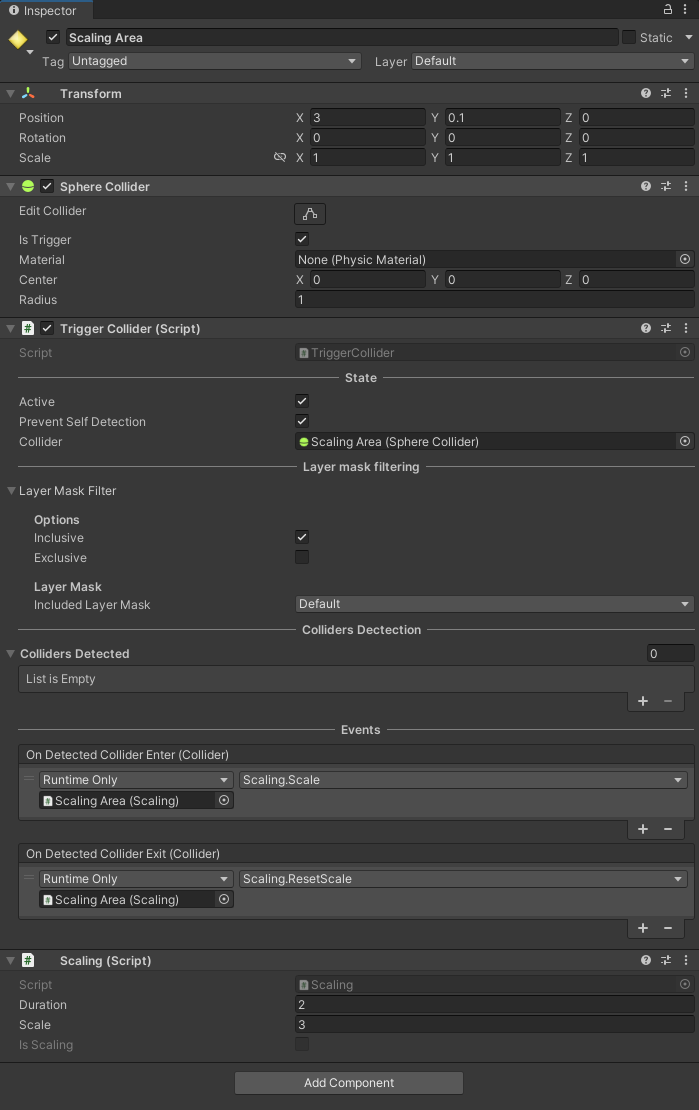
In this example, I have setup a GameObject with a Sphere Collider set as a Trigger.
When other GameObjects with Rigidbody enter it, a method is called using the event OnDetectedColliderEnter to change the local scale of the object using the Scaling component. When exiting the Trigger the scale is reset back to 1f.
You can use Trigger2DCollider for 2D projects, you can also create a component inheriting from Trigger2DCollider or TriggerCollider and override the Enter and Exit methods if you need to modify the filtering system.
I didn't make a Tag filtering system because I personally don't like string comparison.
4. Float Value Condition
It's very common to call several methods from different scripts when a float value reaches a particular value. For example, we can play a sound effect and turn the screen red when the player's health falls below a certain percentage.
This is done using the FloatValueCondition class, which evaluates whether the condition is met when the health value changes.
By using events, the components are decoupled and we can reuse the FloatValueCondition class in many scenarios.
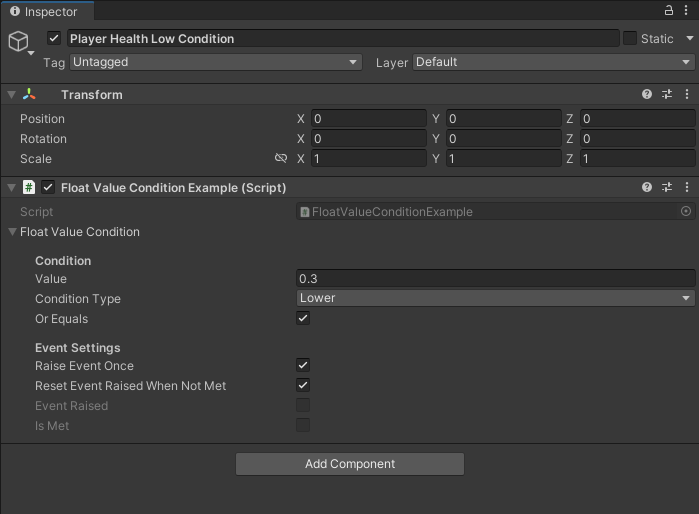
FloatValueConditionExample will check if the value is lower or equals than 0.3 which represents the player's health percentage.
RaiseEventOnce means that if the condition is already met and the player's health drops below 0.3f, we won't re-raise the event, because the condition is still true.
We set ResetEventRaisedWhenNotMet to true, so if the player's health percentage exceeds 0.3f, we want to raise the event if it drops below 0.3f.
By setting the ConditonType to Equals, we can specify the precision of the equality since we're using floating-point numbers, for example we can consider 99.96 to be equal to 100.
5. Timer Manager
We often need to raise an event after some time is elapsed by using Coroutine with WaitForSeconds or by incrementing a timer in the Update method of a MonoBehaviour.
This is why I created two simple class Timer and CountdownTimer responsible for this.
These are simple C# classes, they depend on the TimerManager to be started and to update their time.
Here's an example to prevent the player from spamming an attack with their character:
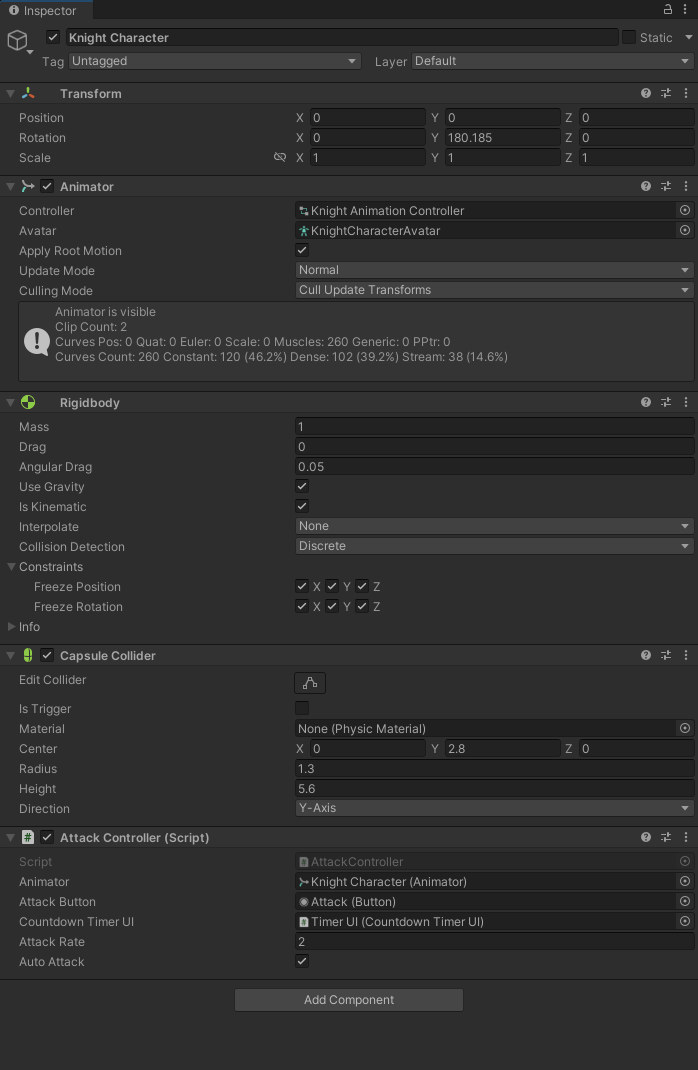
[SerializeField] private Animator _animator;
[SerializeField] private Button _attackButton;
[SerializeField] private CountdownTimerUI _countdownTimerUI;
[SerializeField] private float _attackRate;
[SerializeField] private bool _autoAttack;

private CountdownTimer _countdownTimer;

public bool IsOnCooldown => _countdownTimer.IsRunning;

public CountdownTimer CountdownTimer { get => _countdownTimer; protected set => _countdownTimer = value; }

private void Start()
{
    _countdownTimer = new CountdownTimer(_attackRate, loop: _autoAttack);

    _countdownTimerUI.Initialize(_countdownTimer);

    // We have to manually click on the button to Start the timer
    _countdownTimer.OnTimerStart += DisableAttackButton;
    _countdownTimer.OnTimerStop += EnableAttackButton;
}

// This is called when clicking the 'Attack' button
public void Attack()
{
    if (IsOnCooldown) { return; }

    TimerManager.Instance.StartTimer(_countdownTimer);

    _animator.SetTrigger("Attack");
}

private void AutoAttack()
{
    _animator.SetTrigger("Attack");
}

private void DisableAttackButton()
{
    _attackButton.interactable = false;
}

private void EnableAttackButton()
{
    _attackButton.interactable = true;
}
When the CountdownTimer starts, we disable the attack button and enable it when the timer stops.
We call TimerManager.Instance.StartTimer to add our countdown to as an active timer,
The TimerManager will update each timer every frame, which is more efficient than using one MonoBehaviour per timer.
Here, the countdown starts with an initial time of 2 seconds (the attack rate) and stops automatically when its time reaches 0.
We can also set AutoAttack to true so the timer loops indefinitely, the OnTimerLooped event is raised and our character executes the attack animation.
We need to change the Start method to use the AutoAttack system:
private void Start()
{
    _countdownTimer = new CountdownTimer(_attackRate, loop: _autoAttack);

    _countdownTimerUI.Initialize(_countdownTimer);

    if (_autoAttack)
    {
        DisableAttackButton();

        // Every time the count down timer is done it will reset and start again automatically
        _countdownTimer.OnTimerLooped += AutoAttack;

        // Perform the attack, start the count down timer
        _attackButton.onClick.Invoke();
        TimerManager.Instance.StartTimer(_countdownTimer);
        return;
    }

    // We have to manually click on the button to Start the timer
    _countdownTimer.OnTimerStart += DisableAttackButton;
    _countdownTimer.OnTimerStop += EnableAttackButton;
}
We don't need to use the Button, and we start the timer only once, it will stay inside the TimerManager and loop forever.
Let's see how we update the UI to display the remaining time of the timer and to update the progress bar.
[Header("Update Text/Progress Bar")]
[SerializeField] private bool _enableTextUpdate = true;
[SerializeField] private bool _changeTextInUpdateMethod = true;
[SerializeField] private bool _enableProgressBarUpdate = true;

[Header("References")]
[SerializeField] private TextMeshProUGUI _timeInSeconds;
[SerializeField] private Image _progressBarImage;

[Header("Countdown Timer")]
[SerializeField] private CountdownTimer _countdownTimer;

public bool ChangeTextInUpdateMethod { get => _changeTextInUpdateMethod; set => _changeTextInUpdateMethod = value; }
public bool EnableTextUpdate { get => _enableTextUpdate; set => _enableTextUpdate = value; }
public bool EnableProgressBarUpdate { get => _enableProgressBarUpdate; set => _enableProgressBarUpdate = value; }

public void Initialize(CountdownTimer countdownTimer)
{
    _countdownTimer = countdownTimer;

    /* Normally we verify if the TextMeshProUGUI and Image are set */

    if (_enableTextUpdate)
    {
        // We use the countdown timer event to update the text value every second instead of every frame
        if (_changeTextInUpdateMethod == false)
        {
            // We don't need any decimal because we display the time in second
            _countdownTimer.TimeFormat = "F0";
            _countdownTimer.OnSecondElapsed += UpdateText;
        }

        _timeInSeconds.text = _countdownTimer.TimeAsString;
        _countdownTimer.OnTimerStop += UpdateText;
    }

    if (_enableProgressBarUpdate)
    {
        _countdownTimer.OnTimerStop += UpdateProgressBar;
    }
}

/// <summary>
/// Set the text value using the current Time left on the countdown timer.
/// </summary>
public void UpdateText()
{
    if(EnableTextUpdate == false) { return; }

    _timeInSeconds.text = _countdownTimer.TimeAsString;
}

/// <summary>
/// Set the fill amount of the progress bar image using the current Progress on the countdown timer.
/// </summary>
public void UpdateProgressBar()
{
    if(EnableProgressBarUpdate == false) { return; }

    _progressBarImage.fillAmount = _countdownTimer.Progress;
}

private void Update()
{
    if (_changeTextInUpdateMethod)
    {
        UpdateText();
    }

    UpdateProgressBar();
}
Here, we can either update the text to show the time remaining in the update method, but this runs every frame. Instead, we can set _changeTextInUpdateMethod to false, to use the OnSecondElapsed event to update it every second.